Friday, December 25, 2009

Gift Bag and a little Christmas!

Merry Christmas!!! It has been a wonderful 2 days of Christmas here! We even had a little bit of a White Christmas here in St. Louis this morning! It was perfect! I have a few pictures to share after I show you a gift bag that I created for a stampin' friend of mine. I created a few of these last year for my mom and sisters. But I used red gifts bags last year.

Ok, now for a few pictures from our Christmas...
Here is our Christmas tree. It is decorated in white lights and silver beads.
There are a variety of ornaments that I love. I have a couple of Hallmark collections...Mischievous Kittens & Marjolein Bastin. Plus we have many Dallas Cowboys ornaments that we have collected over the years. Some year I would like to have a theme tree, but I do love my traditional tree.
Here is my sweet son on Christmas Eve! Love the chocolate on his face!!!
It has been so fun with him this year!! RJ left some yummy treats and chocolate milk (Santa's favorite) for Santa to enjoy when he delivered his presents. When RJ woke up on Christmas morning, he was so excited to see if Santa ate his treats! It only took him a few minutes to realize that Santa left him a few gifts!
Next is a picture of my stepson & stepdaughter with RJ on Christmas Eve. They all adore each other!
Finally, the last picture is of one of our cats, Gabby, playing with ribbon under the tree. She likes to get in on all the excitement too!!!
I hope you and your family had a very Merry Christmas. I look forward to blogging with you in the New Year! It's been a crazy month here. With the Holidays and my Dad having open heart surgery (he did great and is at home recovering!!!), I haven't had much time for stamping in my life. But I'm hoping to get into the full swing of stampin' in the next week or so!! We have a ton of stuff coming up in the stampin' world next month...a new Mini Catalog and Sale-A-Bration!!! Can't wait!!!
Take care and I'll see you soon back here at the ole' blog!
Karen

Friday, December 11, 2009

DAY 1 - 12 Days of Christmas

Hi! Today is the first day of Stampin' Up's 12 Days of Christmas! For the next 12 days, Stampin' Up! is offering a discount on select Big Shot Dies and Materials. Go take a look at


When you click on the promotion, you will see a "Regular Price" and a "Preferred Price". Both of these prices have been discounted, but you will want the "Preferred Price"! To get the "Preferred Prices", you will need to order through a Stampin' Up! Demonstrator. So contact me today if you would like to order anything from the 12 DAYS OF CHRISTMAS promotion. These specials will be offered until December 22nd.

Have a great weekend!

Karen

Wednesday, December 9, 2009

Sweet Day!

Hi! Here is another card that we stamped at my Day-Time Stampin' class this month. We stamped the cupcakes on Watercolor paper with Staz-On ink. Then we watercolored with blender pens and ink from an ink pad lid.

Supplies:
Stamps: Crazy for Cupcakes
Ink: Melon Mambo, Bermuda Bay, Real Red Marker, Going Grey, Jet Black Staz-On
Paper: Melon Mambo, Bermuda Bay, Whisper White, Watercolor Paper
Accessories: Blender Pens, Scallop Oval Punch, Large Oval Punch, Ticket Corner Punch, Dimensionals, Melon Mambo Polka-Dot Ribbon

Thanks for stopping by!

Karen

Tuesday, December 8, 2009

Hi! It's been awhile, huh??? My last Day-Time Stampin' Class for 2009 was held this morning and here is one of the cards that we created. I was inspired by this card on Splitcoaststampers.


Supplies:
Stamps: Four Square

Ink: Pumpkin Pie
Paper: Pumpkin Pie, Ballet Blue, Whisper White, Pawsitively Prints DSP
Accessories: Square Scallop Punch, Pumpkin Pie Grosgrain Ribbon, Boho Blossoms Punch, Silver Brads, Mini Glue Dots, Dimensionals, Paper Snips

I wanted to give a very special thanks to all the ladies who have been coming to my Day-Time Classes every month!! I look forward to seeing you each month. You are a great group of ladies and I appreciate you more than you know!! Looking forward to a new year of Day-Time Stampin'!

I have had a request or two to start a "Night-Time" Stampin' Class. I am thinking about adding a new class in the new year! More details coming soon!

Have a great day! I'll be back tomorrow with another card!

Karen

Tuesday, November 24, 2009

Dasher

Hi! Here is a card that each of my stamp club friends received at stamp club this month. I received some very cute cards in return!!

Supplies:
Stamps: Dasher
Ink: Chocolate Chip
Paper: Old Olive, Chocolate Chip, Very Vanilla, Merry Moments DSP
Accessories: Real Red Grosgrain Ribbon, Mini Glue Dots, Dimensionals

Have a great Wednesday! And Happy Thanksgiving to each of you!!!!

Karen

Pretty Gold Dove!

Hi! This picture really does not do this card justice. It really is pretty! You have to see the gold metallic image in real life. It's a beautiful! This is another card that we stamped at my November stamp club.

Supplies:
Stamps: Gifts of Christmas
Ink: Gold Encore Pad
Paper: Whisper White, Real Red, Brushed Gold
Accessories: Petals A Plenty Embossing Folder, Big Shot, Dimensionals.

This is a great Christmas card that is very mailable and easy to mass produce. Just need the gold ink to dry a bit!!

Ok, so this includes the 3 projects that we stamped at stamp club this month. Please let me know if you have any questions. I still need to show you my swap card that I created for my stamp club friends. Stay tuned tomorrow.

Karen

Monday, November 23, 2009

Merry Christmas Top Note Box

Hi! Here is another project that we stamped at my November stamp club. This Top Note Box is quite easy to make!!! And the possibilities!! It makes a great holder for special treats, gift cards, or a small gift. Want to make this box? There is a great tutorial here on SCS.

Supplies:
Stamps: Delightful Decorations, Holidays & Wishes
Ink: Real Red
Paper: Kraft, Real Red, Very Vanilla, Merry Moments
Accessories: Top Note Die, Big Shot, Ornament Punch, Real Red Grosgrain Ribbon, Chocolate Chip Grosgrain Ribbon, Mini Glue Dots, Dimensionals


I have another project for you tomorrow. So be sure to stop by!

Karen


Sunday, November 22, 2009

Merry Christmas Patterned Pines

Hi! Long time, no see!!!! It's been a busy November, but I am happy to bring you a card that we stamped at my November stamp club this past Friday.

Supplies:
Stamps: Patterned Pines, All Holidays
Ink: Mellow Moss, Always Artichoke, Garden Green, Real Red
Paper: Mellow Moss, Real Red, Very Vanilla, Merry Moments DSP
Accessories: Dimensionals

Thanks for stopping by!!!

Karen

Tuesday, November 17, 2009

Hi! Here are 2 more cards that I created while I was playin' around Sunday evening in my stampin' area. It's the same layout and all from the previous post.

Supplies:
Stamps: Watercolor Vine Jumbo Wheel, Hugs & Wishes (retired)
Ink: Soft Suede, Versamark, Soft Suede Marker (for spritzing)
Paper: Whisper White, Soft Suede
Accessories: White Embossing Powder, Color Spritzing Tool


The next card looks a little plain in the picture, but it's really sparkly in person! Each snowflake is accented with Crystal Effects and Dazzling Diamonds. And the white sentiment pops a little more than it shows in the picture.

Supplies:
Stamps: Serene Snowflakes, All Holidays
Ink: Bashful Blue, Versamark
Paper: Whisper White, Bashful Blue
Accessories: White Embossing Powder, Crystal Effects with Dazzling Diamonds

Take care and I'll see you soon!

Karen

Monday, November 16, 2009

Simple, elegant & fun!

Hi! Here are a couple of cards that I created based on the this card by Nichole Heady. For my first card, I stamped the flower image in Versamark because I thought the Bermuda Bay was too dark. A little lesson I learned...Versamark doesn't completely dry for a very looooonnnnggggg time. When I went to emboss my sentiment image, I had embossing powder everywhere on my flower image, even though I left it dry for a long time! So after 3 attempts, I was able to get a clean image for my sentiment. So beware, if you are stamping the background in Versamark, let it dry a very long time before embossing your sentiment. :)

Supplies:
Stamps: Kind & Caring Thoughts
Ink: Versamark, Versamark
Paper: Whisper White, Bermuda Bay
Accessories: White Embossing Powder

For the next card, I wheeled across the Pink Passion cardstock with a Jumbo Wheel. The card looked a little plain until I added the Rhinestones. It added a little bling!! Isn't this a perfect card for a special young girl?

Supplies:
Stamps: Spot On Jumbo Wheel, It's Your Birthday
Ink: Pink Passion, Versamark
Paper: Whisper White, Pink Passion
Accessories: White Embossing Powder, Rhinestones (non SU!), Tombow Multi-Purpose Glue

I have 2 more cards using this same layout for you on Tuesday.

Sunday, November 15, 2009

So Peaceful!

Hi! Today's card idea came from the third card on this post by Nichole Heady. She is such a talented stamper! I get so much inspiration from her. This card is so peaceful, don't you think? I love the white on Kraft cardstock!

Supplies:
Stamps: Kind & Caring Thoughts, More Great Greetings (very retired)
Ink: White Craft, Versamark
Paper: Whisper White, Kraft, Barely Banana
Accessories: Butterfly Punch, Half Pearl from Pretties Kit, White Embossing Powder, Mini Glue Dots

Hope you all had a great weekend! I'll be back tomorrow with a few more cards created from Nichole's inspiration!

Karen

Saturday, November 14, 2009

Merry Christmas card

Hi! I saw this card and thought it would be a great layout for a card using an ornament from the Delightful Decorations stamp set. We stamped this card at my November Day-Time Stampin' class.

Supplies:
Stamps: Delightful Decorations, Christmas Greetings
Ink: Real Red
Paper: Kraft, Real Red, Old Olive, Very Vanilla, Merry Moments DSP
Accessories: Ornament Punch, Top Note Die with Big Shot, Vanilla Taffeta Ribbon, Square Rhinestone Brads, Dimensionals

Thanks for stopping by! Have a great weekend!

Karen

Friday, November 13, 2009

Hi! Here is another card that we stamped at my Day-Time Stampin' class this week. I have had a sketch written down for so long on a post-it note. It was stuck on one of my cabinets forever!!! So I thought I would put the sketch to good use for this card. I'm sorry I can't give credit to where I found this layout, but I didn't write down any notes with the sketch (like I said, it's been awhile since I wrote down this sketch). I thought it turned out pretty good!! Such cheery colors! As always, I leave various sentiments out for everybody to customize their own greeting. This card will work for many different sentiments.

Supplies:
Stamps: A Beautiful, Thank You Kindly, It's Beautiful Jumbo Wheel
Ink: Melon Mambo, So Saffron (ink cartridge)
Paper: So Saffron, Melon Mambo, Bermuda Bay, Whisper White
Accessories: Scallop Circle Punch, 1-1/4" & 1-3/8" Circle Punches, Trio Flower Punch, Silver Brads, Bermuda Bay Polka-Dot Ribbon, Dimensionals

Happy Friday to you!!! I'm looking forward to a not-so-busy weekend!!! I'm participating in a Vendor Show this evening. But other than that, I will be hanging around the house doing some much neglected projects!!

Karen

Wednesday, November 11, 2009

Pretty Butterfly!

Hi! Finally...a non-Holiday Card!! I have been having so much fun creating Christmas cards. It was challenging to create something different. But my 1st session of my November Day-Time Class met this week, so I wanted to make sure that they stamped a non-Holiday card or two!!

I was inspired to create the following card when I saw this card on the Simple & Sincere blog. I changed it up a bit and this is what I came up with. I love-love-love how the white just pops off the Bermuda Bay color!!! And look at that sentiment!!! Doesn't it just pop (it really does in real life!!)? I used my Chit Chat Rub-Ons!!! I'm not sure why I don't use my Rub-Ons more often! And the Chit Chat Rub-Ons are awesome! There are over 90 sentiments on each sheet. You get a Chocolate Chip sheet and White sheet! You get a HUGE variety of sentiments and they are sooooo easy to use! Check them out on page 177 in Stampin' Up's catalog! When you are ready to order, just contact me!! :)

Supplies:
Stamps: none!!
Ink: none!!!
Paper: Bermuda Bay, Whisper White, Vellum Cardstock, Thoroughly Modern DSP
Accessories: Scallop Edge Punch, Butterfly Punch, Chit Chat Rub-Ons, Half Pearl from Pretties Kit, Mini Glue Dots

Thanks for stopping by!
Karen

Tuesday, November 10, 2009

FTL66...some more Holiday cards!

Hi! I really tried to share some non-Holiday cards with you today, but they just didn't photograph well! I actually have 2 cards, and for some reason the color Bermuda Bay is not photographing well at all. It looks too blue, and not enough green. So hopefully the sun will be out in the morning and I can get better pictures.

So here are a couple of Holiday cards that I worked on Sunday evening. I was playing around with the FTL66 Sketch on the Clean and Simple blog, and here is what I came up with.

Supplies (above):
Stamps: Dasher, Four the Holidays
Ink: Chocolate Chip
Paper: Chocolate Chip, Real Red, Very Vanilla, Merry Moments DSP
Accessories: Chocolate Chip Taffeta Ribbon, Horizontal Slot Punch, Dimensionals
Supplies (above):
Stamps: Delightful Decorations, Holidays & Wishes
Ink: Real Red, Chocolate Chip
Paper: Chocolate Chip, Real Red, Very Vanilla, Merry Moments DSP
Accessories: Chocolate Chip Taffeta Ribbon, Clear Rhinestones from Pretties Kit, Dimensionals

Have a great day!

Karen

Monday, November 9, 2009

Holiday Stamp-A-Stack Card #5

Hi! First of all, I would like to thank all my stampin' friends who joined me this weekend for my annual Holiday Stamp-A-Stack. I appreciate your support and I enjoyed chatting with everyone!! I hope you enjoyed yourself too!! Did the Christmas music put you in the Christmas mood? I have been listening to it all week while preparing for this class! My husband had to ask me once to turn it down!! I guess I got carried away! I love Christmas music! Do you have a favorite Christmas song or CD?

Here is my final card that we stamped at my annual Holiday Stamp-A-Stack. I have seen many cards with this layout and it's perfect for this stamp set. I didn't have enough Chocolate Chip Grosgrain Ribbon for everybody to make 2 cards. So they used the Chocolate Chip Taffeta Ribbon for their second card. This card is so pretty in real life. The Dazzling Diamonds glitter is really what makes this card. It's kind of "flat" without it!! I found that it was easier to stamp the ornaments first, then the ribbon. Oh, and one more tip...when stamping the ribbon, do not "smoosh" your stamp. It won't be very pretty!! Just lightly stamp and add a little pressure. :)

Supplies:
Stamps: Tree Trimmings, Four the Holidays
Ink: Chocolate Chip, Real Red, Old Olive
Paper: Old Olive, Real Red, Whisper White
Accessories: Chocolate Chip Grosgrain Ribbon, Eyelet Border Punch, 2-way Glue Pen, Dazzling Diamonds Glitter

Ok, well that does it for my cards that we stamped at my Holiday Stamp-A-Stack this past weekend. I still have one more session for this event...Tuesday, December 1st at 10:00 a.m. Please join me if you are available during the day.

I hope you have enjoyed seeing my Holiday Stamp-A-Stack cards!! I hope you are inspired to create your own Christmas cards!!

Karen

Sunday, November 8, 2009

Holiday Stamp-A-Stack Card #4

Hi! Here is Card #4 for my Holiday Stamp-A-Stack. It's a simple one and among my favorites!! Love the colors!

Supplies:
Stamps: Dasher, Snow Swirled (for the greeting), Christmas Punch (for the snowflakes)
Ink: Versamark, Chocolate Chip, Always Artichoke
Paper: Kraft, Chocolate Chip, Always Artichoke, Very Vanilla
Accessories: Always Artichoke Grosgrain Ribbon, Dimensionals

Stop by on Monday for the final card!!

Karen

Saturday, November 7, 2009

Holiday Stamp-A-Stack Card #3

Hi! I'm back to share with you Card #3 from my Holiday Stamp-A-Stack. My friend, Rita created a similar card for a Showbox Swap that I hosted several weeks ago. She used a Red and Green color combo, but I was using so much red/green for my Holiday cards, so I thought I would switch it up a bit. At first when I created this card, I used the Whisper White cardstock for my card, but it just didn't seem sturdy. I love-love-love our Whisper White Cardstock for stamping, because it's so smooth and the ink absorbs beautifully into the cardstock. But it's a lighter weight cardstock, and I don't think it's strong enough to stand up for a card unless you are creating a single layer card. So the card is Night of Navy, and I adhered another piece of Whisper White CS to the inside of the card to stamp a snowflake and the greeting.

Isn't the medallion piece pretty?

Supplies:
Stamps: Serene Snowflakes, Four the Holidays
Ink: Night of Navy, Versamark
Paper: Night of Navy, Whisper White, Brushed Silver
Accessories: Scallop Border Punch, White Embossing Powder, Silver Brads, Dimensionals


Check back for Cards #4 & #5 on Sunday and Monday.

Have a great weekend!
Karen

Friday, November 6, 2009

Holiday Stamp-A-Stack Card #2

Hi! Remember this card???? We are going to be stamping this card at my annual Holiday Stamp-A-Stack this weekend. For this card, I actually used Crystal Effects with Dazzling Diamonds for the center of the flowers, instead of Stickles. I like how the Crystal Effects turned out better.
I have 3 more cards to show, so please check back on Saturday, Sunday & Monday!!!
Supplies:
Stamps: Lovely as a Tree, Christmas Punch, Season of Joy (for the flower)
Ink: Certainly Celery, Real Red
Paper: Certainly Celery, Real Red, Whisper White
Accessories: Wide Oval Punch, Petals-A-Plenty Embossing Folder, Big Shot, Dimensionals, Crystal Effects with Dazzling Diamonds
See you on Saturday!
Karen

Thursday, November 5, 2009

Holiday Stamp-A-Stack Card #1

Hi! Just popping in to share one of the 5 cards that we will be stamping this weekend at my annual Holiday Stamp-A-Stack. I think the cards turned out pretty good!! I'm excited to share with you the rest of the cards this weekend!
Supplies:
Stamps: Delightful Decorations, All Holidays
Ink: Garden Green, Real Red
Paper: Real Red, Garden Green, Very Vanilla, Merry Moments DSP
Accessories: Ornament Punch, Real Red Grosgrain Ribbon, Dimensionals

Thanks for stopping by!

Karen

Wednesday, November 4, 2009

FTL #66

Hi! I created this card for the Fall-To-Layout #66 on the Clean & Simple Blog!! What would I do without this blog for so much of my inspiration? I just love their weekly challenges!!

For the snowflake in the middle of the ornament, I used Stampin' Up's Shimmer Paint with a Sponge Dauber and applied it directly to the stamp. It really shimmers!!! Nice little touch! This would be a great card to mass produce for your Christmas Card. So simple and very few supplies!!!

Supplies:
Stamps: Teeny Tiny Wishes
Ink: Real Red
Paper: Old Olive, Real Red, Very Vanilla, Dasher DSP (retired)
Accessories: Ornament Punch, Frost White Shimmer Paint, Vanilla Taffeta Ribbon, Dimensionals

I can't believe I have been able to create 2 cards this week for my blog. I have my annual Holiday Stamp-A-Stack on Friday & Saturday. It's probably my biggest event of the year, and I am usually so busy with designing my cards and cutting cardstock!!! Don't get me wrong!! I have plenty still to do, but I have ALL 5 of my cards designed, and my samples made!!! I can't believe it!! It's kind of relaxing knowing that the design part is done!! So before I head upstairs to bed, I decided to make a clean and simple card for the blog. I hope you enjoy!!

Have a great rest of the week and I'll catch you back here soon!

Karen

Monday, November 2, 2009

Season's Greetings!

Hi! Just a quick post tonight. Hope you had a great weekend and Halloween! I have been working on my cards for my upcoming Holiday Stamp-A-Stack, but was able to stamp up a little something extra to share on my blog!! This card is very simple! It would be a great Christmas to mass produce!! Quick and easy!!

Inspiration for my card came from this card on SCS.

Supplies:
Stamps: Many Merry Messages, Delightful Decorations
Ink: Real Red
Cardstock: Real Red, Whisper White, DSP (retired...Ski Slope)
Accessories: White Taffeta Ribbon, Ornament Punch, Dimensionals, Mini Glue Dots

Thanks for stopping by!! Have a great week!

Karen

Thursday, October 29, 2009

A Pretty Christmas Card

Happy Thursday to you!!! I wanted to make another card using the tree from Lovely as a Tree and the small red poinsettia flower. To make the red flowers really pop again, I used Certainly Celery ink for the tree. The sentiment from the Christmas Punch set is cut out, so that I could layer Real Red behind it, which is punched from the Wide Oval Punch. And what about the embossing folder?...just beautiful! It's available in the Holiday Mini Catalog. To add a little bling, I added some Stickles (from a craft store), to each flower. It adds a bit of sparkle to the card. I really like how this card turned out!! It has alot of layers, but I think it's pretty!

Supplies:
Stamps: Lovely as a Tree, Christmas Punch, Season of Joy (for the flower)
Ink: Certainly Celery, Real Red
Paper: Certainly Celery, Real Red, Whisper White
Accessories: Wide Oval Punch, Petals-A-Plenty Embossing Folder, Big Shot, Dimensionals, Stickles (non-SU)

See you soon!
Karen

Wednesday, October 28, 2009

Simple, Simple

Hi! Here is a really quick and easy card. I was inspired by this card on Simplicity's Blog. Her card is super cute! Check it out!

The sentiment is from the Holiday Mini Catalog. The stamp set has 4 different Holiday Greetings in it! It's a great set! The bling in the middle of each snowflake are just some little jewels that I purchased years ago from a fabric store to add a little glitz to my stepdaughters dress and matching purse for a dance she was going to. I use these little jewels all the time on my cards! Just add a little Tombow MultiPurpose Glue to make them stick!

Supplies:
Stamps: Snow Swirled, Four the Holidays
Ink: Bashful Blue, Brilliant Blue
Paper: Whisper White, Brilliant Blue
Accessories: 1-1/4" & 1-3/8" Circle Punches

Thanks for stopping by! I have another Christmas Card for you tomorrow!!

Karen

Tuesday, October 27, 2009

My UPS guys!!

Hi! Here is a picture of both of my UPS men!!! For the longest time, RJ called the UPS man the PUS man!!! And that's what he wanted to be for Halloween! He looks absolutely adorable in his uniform, doesn't he? We lovvvvvve when the UPS comes to visit us, because that usually means he is bringing some fun stampin' stuff for me!! We have had the same UPS guy for a very long time! He is just so nice!! And he was kind enough to stop for a picture! We waited forever for him to come to our house on Monday, but we just saw him drive pass our house! And I knew I was having a package delivered to our house that day. But then a different guy came a little later in the day, but I didn't want his picture!! LOL!! So I decided to take a chance and just hope that I saw our regular UPS guy today, when I knew another package was on its way! WooHoo!!!

Hope you are having a great day!

Karen

Monday, October 26, 2009

FTL #62

Hi! Hope you had a great weekend! Ours was a bit busy, but fun! We went to a bonfire on Saturday evening and had a good time with friends! Sunday was football, so my husband was gone watching all the games, and RJ and I headed out to find a Halloween costume for him, then headed to my parents to visit and have dinner. Edited to Add: I will post a picture or two of RJ with his costume a little later this week! I have to have the right setting. ;)

I stamped a bit on Sunday evening, and I wanted to share a card with you. It all started with a layout (FTL62) shown over at the Clean and Simple blog. Did I tell you that I love to stamp based on a layout?? :) I didn't have the large scallop punch that they used, so I punched out a few 1-3/4" circles and made it look like a large scallop. The ribbon covers up all the "ugly" stuff! The DSP is Bella Birds, which retired in August. Sorry, still have alot of paper to use up!! But this a great layout for any kind of card! Give it a try!

Supplies:
Stamps: Sincere Salutations
Ink: Bordering Blue
Paper: Bordering Blue, Bella Birds DSP (retired)
Accessories: Pink Pirouette Ribbon (retired), Buttons, Linen Thread, Bordering Blue Stampin' Write Marker

Have a great Monday!

Karen

Saturday, October 24, 2009

FTL #63 for my husband's birthday!

Hi again! Here is a card using the Fall-to-Layout #63 on the Clean and Simple Blog. I just love using sketches as my inspiration to stamp! And the Clean & Simple sketches are perfect for me! I love the simplicity! You can keep them as simple as they are or you can use the sketch as a starting point to create something more involved! They are great!

I created this card for my husband. It was his birthday on Friday. The colors are Bordering Blue, Night of Navy, Brushed Silver, & Whisper White. I outlined the sentiment with my Silver Zig Painty marker.
Supplies:
Stamps: Wanted, A Little Birthday Cheer
Ink: Night of Navy, Bordering Blue, Silver Colorbox
Paper: Bordering Blue, Night of Navy, Brushed Silver, Whisper White
Accessories: Star Brads, Dimensionals

Hope you are having a great weekend!

Karen

Friday, October 23, 2009

FTL #64

Hi! I created this card for the Fall-to-Layout #64 on the Clean and Simple Blog. I thought it would make a cute Bridal Shower card. This is a great layout! You should give it a try!

Supplies:
Stamps: Teeny Tiny Wishes
Ink: Regal Rose
Paper: Sahara Sand, Regal Rose, Whisper White, Pink Pirouette Patterns DSP
Accessories: Flower-Daisies #2 Die with Big Shot, 1/2" Circle Punch, Modern Label Punch, Soft Subtles Brads, White Organza Ribbon, Dimensionals

Thanks for stopping by! Have a great weekend!

Karen

Sunday, October 18, 2009

Hi! Hope you are having a great weekend so far! Enjoy your Sunday!!

This layout was inspired by Kimberly's card here. You can check out her blog, StampinBy the Sea. I love the wavy banner!!! I used a Mini Glue Dot under the banner, and gave it a little wave before adhering it to the cardstock. The jewels are some rhinestones that I purchased years ago for a different project. They always come in handy when I'm looking for some bling! The DSP is retired (I'm trying to use up some of my stash!!!). I only have less than one sheet in this pack!! Woo Hoo!!! I think I will use it up by making several more of these cards.

Have you started on your Christmas cards yet???

Enjoy your Sunday and hope you have a great week!

Karen

Saturday, October 17, 2009

Pretty Tree!

Hi! I saw an idea on Julie's blog, Paper Pleasing Ideas. She used the tall tree from Lovely As A Tree, and stamped a flower on the tree. It was so pretty, so I wanted to recreate her card using Real Red and Sahara Sand. You can see Julie's card here. The tree gets a little washed out by the lighting in the picture, but it really shows up in real life. (I will figure out my camera one of these days!!) But it's light enough to really make the flowers pop!! Julie used the poinsetta from the Christmas Punch Hostess set. I used a Real Red marker so that I only inked up the poinsetta from the stamp. I thought it would tedious and time-consuming to stamp the flower, but it wasn't bad at all. But if you have the Season of Joy stamp set, the little flower in that set will work perfectly for this card!! The DSP is the retired Dashing DSP. I'm sure there are a few of us who have a stash of this paper!!

Supplies:
Stamps: Lovely As A Tree, Christmas Punch, Best Yet
Ink: Sahara Sand, Real Red
Paper: Sahara Sand, Real Red, Very Vanilla, Dashing DSP (retired)
Accessories: Silver Brads, Real Red Grosgrain Ribbon, Dimensionals

Thanks for stopping by today!

Karen

Friday, October 16, 2009

Celebrate You!

Hi! I had a sketch for this card in my sketch book, but I did not make reference to where I got the sketch from...Sorry about that. This is another card that we stamped at my Day-Time Stampin' Classes for October.

Supplies:
Stamps: Party Hearty

Ink: Melon Mambo
Paper: Melon Mambo, Rich Razzleberry, Whisper White, Razzleberry Lemonade DSP
Accessories: Scallop Circle Punch, Rich Razzleberry Polka Dot Ribbon, Stampin' Write Markers (Melon Mambo, Rich Razzleberry, Crushed Curry, Pumpkin Pie), Dimensionals

Have a great weekend!
Karen

Thursday, October 15, 2009

Cherish Elegance!

Hi! I love this look! I have been seeing the white embossed cardstock layered with another piece of white cardstock alot on various blogs. It gives such an elegant look, doesn't it? So I thought I would give it a try. This card has been created for my Day-Time Stampin' classes for October.
Supplies:
Stamps: Baroque Motifs
Ink: Rich Razzleberry
Paper: Whisper White, Rich Razzleberry
Accessories: Backgrounds 1 Texturz Plate with Big Shot, White Organza Ribbon, Dimensionals

This card is so pretty in real life!!!

Hope you are having a great week!
Karen

Wednesday, October 14, 2009

Happy Boo to You!

Hi! Here is a card that I created to swap with my stamp club stampers. We swap cards each month to share ideas with each other. This is ANOTHER idea that came from Becky's blog, Inking Idaho. She is so talented. I just changed the colors, DSP, and greeting. You can see Becky's card here.
Supplies:
Stamps: Booglie Eyes - retired :(
Ink: Basic Black
Paper: Punpkin Pie, Basic Black, Whisper White, Cast-a-Spell DSP
Accessories: Small Oval Punch, Large Oval Punch, 1/2" Circle Punch, Black Grosgrain Ribbon, Dimensionals

This is such an easy card to duplicate ALOT of times!!! If you send out Halloween cards, this would be a great one to reproduce and send to those special people in your life! If you don't have the same supplies that I used, change it up a bit!!!

Take care,
Karen

Sunday, October 11, 2009

October Stamp Club Projects!

Hi! My stamp club met on Friday night and here are the 3 projects that we created.

You might have seen the first one in a previous post when I hosted my Shoebox Swap with a few of my Demonstrator friends.

This card is so pretty! It just sparkles and shimmers! I mixed some Frost White Shimmer Paint in a small mist bottle with Rubbing Alcohol. Give it a good shake and spray your cardstock. you can get Shimmery Paper in any of our cardstocks!! You can see a great tutorial on Heather's blog.

Supplies (Let it Snow Card):
Stamps: Big on Christmas
Ink: Jet Black Staz-On, Bashful Blue
Paper: Bashful Blue, Real Red, Whisper White
Accessories: Frost White Shimmer Paint, 1-1/4" Circle Punch, 1/8" Circle Punch, Light Blue Gingham Ribbon, Stampin' Write Markers, Dazzling Diamonds Glitter with 2-way Glue Pen, Snowflake Die with Big Shot, Dimensionals
_________________________

Isn't this next project just absolutely adorable? I can't take even an inkling of credit. I even copied Frankenstein's smile!!! LOL! I get so much inspiration from Becky's blog, Inking Idaho. Check it out and I'm sure you will be inspired! Take a look at this post on her blog...very cute!!!

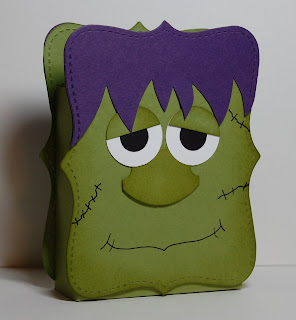
Supplies (for Frankenstein):
Stamps: None
Ink: Old Olive, Black Stampin' Write Marker
Paper: Old Olive, Elegant Eggplant, Whisper White, Basic Black
Accessories: 1" & 1/2" Circle Punches, Top Note Die with Big Shot, Round Tab Punch

________________________

This next project also came from Becky's blog, Inking Idaho. This is a great idea for using these Treat Cups! The black little tab piece is a slider door, so you don't have to rip the card apart to get to the treat!! Is that clever or what? She has a tutorial on her blog.


Supplies (Treat Card):
Stamps: All Holidays, Bitty Boos (retired)
Ink: Basic Black
Paper: Pumpkin Pie, Basic Black, DSP
Accessories: 1-3/4" Circle Punch, Round Tab Punch, Treat Cups Elegant Eggplant Ribbon, Mini Glue Dots

Thanks for stopping by!
Karen

Friday, October 2, 2009

Shoebox Swap Part #3

Hi! Here are 2 more cards that we stamped at our Shoebox Swap last Friday.

by Cherie (below)
This card is absolutely beautiful! We stamped the ornaments in Craft Real Red, then embossed with Iridescent Ice EP. And get this...the branch is the tall tree from Lovely As a Tree turned sideways!!
So clever!

by Sally (below)
This card is soooo elegant! We embossed the reindeer "Dasher" and the Oval Greeting with gold embossing powder. It's so pretty!
(The Dasher stamp is in Stampin' Up's "Under $10" section!!)

I hope you have enjoyed seeing these great projects from our Shoebox Swap. I do have one more to share with you. I'm not sure why I didn't get it photographed. It must not have been in my pile when I was taking pictures. So I will get it posted this weekend.

Have a great weekend! Isn't this just beautiful weather we are having here in St. Louis? Our forecast calls for a nice Fall weekend!

Karen

DEAL #1 OF THE WEEK

Back by Popular Demand...Stampin' Up's Deal of the Week!

DEAL #1
(OCTOBER 1ST THROUGH OCTOBER 12TH)
TRIO FLOWER PUNCH (pg. 186) - REG. $15.95
SPECIAL PRICE $10.99
5-PETAL FLOWER PUNCH (pg. 187) - REG. $15.95
SPECIAL PRICE $10.99
MY WAY PUNCH (pg. 187) - REG. $15.95
SPECIAL PRICE $11.99
Please let me know if you are interested in placing an order. Or if you would like, you can place your order 24/7 on-line at My Business Website. Click on "Shop Now". Also, while you are there, check out the products on the CLEARANCE RACK!! PRICES ARE UNBELIEVABLE!
Have a great Friday!
Karen

Monday, September 28, 2009

Shoebox Swap Part 2

Hi! Here are some more projects that we stamped at our Shoebox Swap this past Friday.

by Sarah (below)
Cute Sour Cream Container made from our Printed Window Sheets.
by Lynn (below)
Cute Treat Bag! The bat is punch from our Tag Punch. Love those googly eyes!
by Linda (below)
We used Shimmer Paint on the cardstock and the Ornament Stamp. Very Pretty!

by Cathy (below)
Non-traditional colors, but I love it!!! The ornaments stamp so nice and clear, and the punch makes it so easy!!! Great card!


A few more on Tuesday! Thanks for stopping by!

Karen