Thursday, October 29, 2009

A Pretty Christmas Card

Happy Thursday to you!!! I wanted to make another card using the tree from Lovely as a Tree and the small red poinsettia flower. To make the red flowers really pop again, I used Certainly Celery ink for the tree. The sentiment from the Christmas Punch set is cut out, so that I could layer Real Red behind it, which is punched from the Wide Oval Punch. And what about the embossing folder?...just beautiful! It's available in the Holiday Mini Catalog. To add a little bling, I added some Stickles (from a craft store), to each flower. It adds a bit of sparkle to the card. I really like how this card turned out!! It has alot of layers, but I think it's pretty!

Supplies:
Stamps: Lovely as a Tree, Christmas Punch, Season of Joy (for the flower)
Ink: Certainly Celery, Real Red
Paper: Certainly Celery, Real Red, Whisper White
Accessories: Wide Oval Punch, Petals-A-Plenty Embossing Folder, Big Shot, Dimensionals, Stickles (non-SU)

See you soon!
Karen

Wednesday, October 28, 2009

Simple, Simple

Hi! Here is a really quick and easy card. I was inspired by this card on Simplicity's Blog. Her card is super cute! Check it out!

The sentiment is from the Holiday Mini Catalog. The stamp set has 4 different Holiday Greetings in it! It's a great set! The bling in the middle of each snowflake are just some little jewels that I purchased years ago from a fabric store to add a little glitz to my stepdaughters dress and matching purse for a dance she was going to. I use these little jewels all the time on my cards! Just add a little Tombow MultiPurpose Glue to make them stick!

Supplies:
Stamps: Snow Swirled, Four the Holidays
Ink: Bashful Blue, Brilliant Blue
Paper: Whisper White, Brilliant Blue
Accessories: 1-1/4" & 1-3/8" Circle Punches

Thanks for stopping by! I have another Christmas Card for you tomorrow!!

Karen

Tuesday, October 27, 2009

My UPS guys!!

Hi! Here is a picture of both of my UPS men!!! For the longest time, RJ called the UPS man the PUS man!!! And that's what he wanted to be for Halloween! He looks absolutely adorable in his uniform, doesn't he? We lovvvvvve when the UPS comes to visit us, because that usually means he is bringing some fun stampin' stuff for me!! We have had the same UPS guy for a very long time! He is just so nice!! And he was kind enough to stop for a picture! We waited forever for him to come to our house on Monday, but we just saw him drive pass our house! And I knew I was having a package delivered to our house that day. But then a different guy came a little later in the day, but I didn't want his picture!! LOL!! So I decided to take a chance and just hope that I saw our regular UPS guy today, when I knew another package was on its way! WooHoo!!!

Hope you are having a great day!

Karen

Monday, October 26, 2009

FTL #62

Hi! Hope you had a great weekend! Ours was a bit busy, but fun! We went to a bonfire on Saturday evening and had a good time with friends! Sunday was football, so my husband was gone watching all the games, and RJ and I headed out to find a Halloween costume for him, then headed to my parents to visit and have dinner. Edited to Add: I will post a picture or two of RJ with his costume a little later this week! I have to have the right setting. ;)

I stamped a bit on Sunday evening, and I wanted to share a card with you. It all started with a layout (FTL62) shown over at the Clean and Simple blog. Did I tell you that I love to stamp based on a layout?? :) I didn't have the large scallop punch that they used, so I punched out a few 1-3/4" circles and made it look like a large scallop. The ribbon covers up all the "ugly" stuff! The DSP is Bella Birds, which retired in August. Sorry, still have alot of paper to use up!! But this a great layout for any kind of card! Give it a try!

Supplies:
Stamps: Sincere Salutations
Ink: Bordering Blue
Paper: Bordering Blue, Bella Birds DSP (retired)
Accessories: Pink Pirouette Ribbon (retired), Buttons, Linen Thread, Bordering Blue Stampin' Write Marker

Have a great Monday!

Karen

Saturday, October 24, 2009

FTL #63 for my husband's birthday!

Hi again! Here is a card using the Fall-to-Layout #63 on the Clean and Simple Blog. I just love using sketches as my inspiration to stamp! And the Clean & Simple sketches are perfect for me! I love the simplicity! You can keep them as simple as they are or you can use the sketch as a starting point to create something more involved! They are great!

I created this card for my husband. It was his birthday on Friday. The colors are Bordering Blue, Night of Navy, Brushed Silver, & Whisper White. I outlined the sentiment with my Silver Zig Painty marker.
Supplies:
Stamps: Wanted, A Little Birthday Cheer
Ink: Night of Navy, Bordering Blue, Silver Colorbox
Paper: Bordering Blue, Night of Navy, Brushed Silver, Whisper White
Accessories: Star Brads, Dimensionals

Hope you are having a great weekend!

Karen

Friday, October 23, 2009

FTL #64

Hi! I created this card for the Fall-to-Layout #64 on the Clean and Simple Blog. I thought it would make a cute Bridal Shower card. This is a great layout! You should give it a try!

Supplies:
Stamps: Teeny Tiny Wishes
Ink: Regal Rose
Paper: Sahara Sand, Regal Rose, Whisper White, Pink Pirouette Patterns DSP
Accessories: Flower-Daisies #2 Die with Big Shot, 1/2" Circle Punch, Modern Label Punch, Soft Subtles Brads, White Organza Ribbon, Dimensionals

Thanks for stopping by! Have a great weekend!

Karen

Sunday, October 18, 2009

Hi! Hope you are having a great weekend so far! Enjoy your Sunday!!

This layout was inspired by Kimberly's card here. You can check out her blog, StampinBy the Sea. I love the wavy banner!!! I used a Mini Glue Dot under the banner, and gave it a little wave before adhering it to the cardstock. The jewels are some rhinestones that I purchased years ago for a different project. They always come in handy when I'm looking for some bling! The DSP is retired (I'm trying to use up some of my stash!!!). I only have less than one sheet in this pack!! Woo Hoo!!! I think I will use it up by making several more of these cards.

Have you started on your Christmas cards yet???

Enjoy your Sunday and hope you have a great week!

Karen

Saturday, October 17, 2009

Pretty Tree!

Hi! I saw an idea on Julie's blog, Paper Pleasing Ideas. She used the tall tree from Lovely As A Tree, and stamped a flower on the tree. It was so pretty, so I wanted to recreate her card using Real Red and Sahara Sand. You can see Julie's card here. The tree gets a little washed out by the lighting in the picture, but it really shows up in real life. (I will figure out my camera one of these days!!) But it's light enough to really make the flowers pop!! Julie used the poinsetta from the Christmas Punch Hostess set. I used a Real Red marker so that I only inked up the poinsetta from the stamp. I thought it would tedious and time-consuming to stamp the flower, but it wasn't bad at all. But if you have the Season of Joy stamp set, the little flower in that set will work perfectly for this card!! The DSP is the retired Dashing DSP. I'm sure there are a few of us who have a stash of this paper!!

Supplies:
Stamps: Lovely As A Tree, Christmas Punch, Best Yet
Ink: Sahara Sand, Real Red
Paper: Sahara Sand, Real Red, Very Vanilla, Dashing DSP (retired)
Accessories: Silver Brads, Real Red Grosgrain Ribbon, Dimensionals

Thanks for stopping by today!

Karen

Friday, October 16, 2009

Celebrate You!

Hi! I had a sketch for this card in my sketch book, but I did not make reference to where I got the sketch from...Sorry about that. This is another card that we stamped at my Day-Time Stampin' Classes for October.

Supplies:
Stamps: Party Hearty

Ink: Melon Mambo
Paper: Melon Mambo, Rich Razzleberry, Whisper White, Razzleberry Lemonade DSP
Accessories: Scallop Circle Punch, Rich Razzleberry Polka Dot Ribbon, Stampin' Write Markers (Melon Mambo, Rich Razzleberry, Crushed Curry, Pumpkin Pie), Dimensionals

Have a great weekend!
Karen

Thursday, October 15, 2009

Cherish Elegance!

Hi! I love this look! I have been seeing the white embossed cardstock layered with another piece of white cardstock alot on various blogs. It gives such an elegant look, doesn't it? So I thought I would give it a try. This card has been created for my Day-Time Stampin' classes for October.
Supplies:
Stamps: Baroque Motifs
Ink: Rich Razzleberry
Paper: Whisper White, Rich Razzleberry
Accessories: Backgrounds 1 Texturz Plate with Big Shot, White Organza Ribbon, Dimensionals

This card is so pretty in real life!!!

Hope you are having a great week!
Karen

Wednesday, October 14, 2009

Happy Boo to You!

Hi! Here is a card that I created to swap with my stamp club stampers. We swap cards each month to share ideas with each other. This is ANOTHER idea that came from Becky's blog, Inking Idaho. She is so talented. I just changed the colors, DSP, and greeting. You can see Becky's card here.
Supplies:
Stamps: Booglie Eyes - retired :(
Ink: Basic Black
Paper: Punpkin Pie, Basic Black, Whisper White, Cast-a-Spell DSP
Accessories: Small Oval Punch, Large Oval Punch, 1/2" Circle Punch, Black Grosgrain Ribbon, Dimensionals

This is such an easy card to duplicate ALOT of times!!! If you send out Halloween cards, this would be a great one to reproduce and send to those special people in your life! If you don't have the same supplies that I used, change it up a bit!!!

Take care,
Karen

Sunday, October 11, 2009

October Stamp Club Projects!

Hi! My stamp club met on Friday night and here are the 3 projects that we created.

You might have seen the first one in a previous post when I hosted my Shoebox Swap with a few of my Demonstrator friends.

This card is so pretty! It just sparkles and shimmers! I mixed some Frost White Shimmer Paint in a small mist bottle with Rubbing Alcohol. Give it a good shake and spray your cardstock. you can get Shimmery Paper in any of our cardstocks!! You can see a great tutorial on Heather's blog.

Supplies (Let it Snow Card):
Stamps: Big on Christmas
Ink: Jet Black Staz-On, Bashful Blue
Paper: Bashful Blue, Real Red, Whisper White
Accessories: Frost White Shimmer Paint, 1-1/4" Circle Punch, 1/8" Circle Punch, Light Blue Gingham Ribbon, Stampin' Write Markers, Dazzling Diamonds Glitter with 2-way Glue Pen, Snowflake Die with Big Shot, Dimensionals
_________________________

Isn't this next project just absolutely adorable? I can't take even an inkling of credit. I even copied Frankenstein's smile!!! LOL! I get so much inspiration from Becky's blog, Inking Idaho. Check it out and I'm sure you will be inspired! Take a look at this post on her blog...very cute!!!
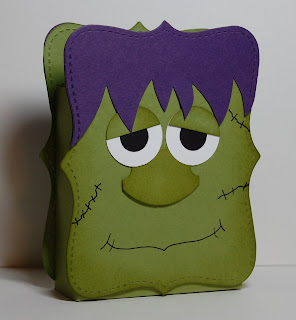
Supplies (for Frankenstein):
Stamps: None
Ink: Old Olive, Black Stampin' Write Marker
Paper: Old Olive, Elegant Eggplant, Whisper White, Basic Black
Accessories: 1" & 1/2" Circle Punches, Top Note Die with Big Shot, Round Tab Punch

________________________

This next project also came from Becky's blog, Inking Idaho. This is a great idea for using these Treat Cups! The black little tab piece is a slider door, so you don't have to rip the card apart to get to the treat!! Is that clever or what? She has a tutorial on her blog.


Supplies (Treat Card):
Stamps: All Holidays, Bitty Boos (retired)
Ink: Basic Black
Paper: Pumpkin Pie, Basic Black, DSP
Accessories: 1-3/4" Circle Punch, Round Tab Punch, Treat Cups Elegant Eggplant Ribbon, Mini Glue Dots

Thanks for stopping by!
Karen

Friday, October 2, 2009

Shoebox Swap Part #3

Hi! Here are 2 more cards that we stamped at our Shoebox Swap last Friday.

by Cherie (below)
This card is absolutely beautiful! We stamped the ornaments in Craft Real Red, then embossed with Iridescent Ice EP. And get this...the branch is the tall tree from Lovely As a Tree turned sideways!!
So clever!

by Sally (below)
This card is soooo elegant! We embossed the reindeer "Dasher" and the Oval Greeting with gold embossing powder. It's so pretty!
(The Dasher stamp is in Stampin' Up's "Under $10" section!!)

I hope you have enjoyed seeing these great projects from our Shoebox Swap. I do have one more to share with you. I'm not sure why I didn't get it photographed. It must not have been in my pile when I was taking pictures. So I will get it posted this weekend.

Have a great weekend! Isn't this just beautiful weather we are having here in St. Louis? Our forecast calls for a nice Fall weekend!

Karen

DEAL #1 OF THE WEEK

Back by Popular Demand...Stampin' Up's Deal of the Week!

DEAL #1
(OCTOBER 1ST THROUGH OCTOBER 12TH)
TRIO FLOWER PUNCH (pg. 186) - REG. $15.95
SPECIAL PRICE $10.99
5-PETAL FLOWER PUNCH (pg. 187) - REG. $15.95
SPECIAL PRICE $10.99
MY WAY PUNCH (pg. 187) - REG. $15.95
SPECIAL PRICE $11.99
Please let me know if you are interested in placing an order. Or if you would like, you can place your order 24/7 on-line at My Business Website. Click on "Shop Now". Also, while you are there, check out the products on the CLEARANCE RACK!! PRICES ARE UNBELIEVABLE!
Have a great Friday!
Karen

Monday, September 28, 2009

Shoebox Swap Part 2

Hi! Here are some more projects that we stamped at our Shoebox Swap this past Friday.

by Sarah (below)
Cute Sour Cream Container made from our Printed Window Sheets.
by Lynn (below)
Cute Treat Bag! The bat is punch from our Tag Punch. Love those googly eyes!
by Linda (below)
We used Shimmer Paint on the cardstock and the Ornament Stamp. Very Pretty!

by Cathy (below)
Non-traditional colors, but I love it!!! The ornaments stamp so nice and clear, and the punch makes it so easy!!! Great card!


A few more on Tuesday! Thanks for stopping by!

Karen

Sunday, September 27, 2009

Dallas & my Shoebox Swap (Part 1)

Hi! It's been sooooo long since I have posted! Sorry about that! We went to Dallas last weekend for a 4-day weekend to see the Dallas Cowboys play in their NEW Cowboys Stadium! I was in awe when we saw the stadium. It's absolutely amazing!! There was nothing held back in building this stadium! We flew into Dallas on Saturday morning, checked into the Gaylord Texan Resort Hotel (fabulous!!!), went on a tour of the new stadium, had an autograph session and dinner with a few Dallas Cowboys players...and that was all on the first day!!! Here I am with my husband during the tour of the stadium the day before the big game! I'll have some more pictures later. Scroll down for some stampin' stuff!!

I hosted a Showbox Swap with a few of my Demonstrator friends on Friday evening. We had a great evening and I got some fabulous ideas!!! I will share them with you today and over the next 2 days.

Here is mine...I hope you can see the shimmer on the Bashful Blue Cardstock. It really is pretty!!! I learned about this technique on Heather's blog here. She has a great video tutorial! I combined a little of our new Frost White Shimmer Paint with some rubbing alcohol in an empty Mist bottle. Give it a good shake and mist your cardstock. It's so easy and so pretty!!

by Alicia (below)...
We also used Shimmer Paint on a Sponge Dauber and "inked up" the stamp on this card. Although it didn't show up very well on the photo, there is a "sponged" rectangle in the middle with all the snowflakes. It's very pretty. I hope you can click on the pictures so you can get a closer look!

by Rita (below)
We used the Scallop Edge Punch to create this medallion look. And the white cardstock is our Shimmery White Cardstock. Very classy card!!


Ok, I will have more tomorrow. Hope you are enjoying this beautiful Sunday! Have a great week!

Karen

Sunday, September 13, 2009

Clear Envelope Brag Book

Hi! I was looking around on SCS, trying to find a great project for my stamp club. I found a nice little brag book made with Stampin' Up's clear envelopes, called Clear Envelope Brag Book. There is a great tutorial found here. There are soooo many possibilities to be creative with this adorable little book! My version is quite simple, but I think it turned out so cute!! I put 6-8 clear envelopes on the inside...perfect for your pictures (you will need to crop them down to 4-1/4"x5-1/2") or to make a nice little scrapbook!


Supplies:
No Stamps and no ink!!!
Cardstock: Kraft, Only Orange, Whisper White, YoYo Yellow
Accessories: Clear Envelopes, Big Shot, Perfect Details Texturz Plate, Flower Daisies #2 Die, Gold Brads, Chocolate Chip Grosgrain Ribbon, 1/2" Circle Punch, Dimensionals

If you didn't want to use the gold brads, you could easily tie ribbon around to keep your book together. This makes a great gift for that special someone, and they are so easy and inexpensive to make! Take a look at the tutorial and you will see how easy it is to make! I'll be making more for sure!! :)

Thanks for stopping by today! Hope you had a great weekend!

Karen

Wednesday, September 9, 2009

Guy Card!

Hi! Here is another card that we stamped at my Day-Time Stampin' Class this month. It's difficult to see, but the Specialty Paper is cut into 3 strips, then attached to the Sahara Sand Cardstock.

Supplies:
Stamps: On Your Birthday
Ink: Chocolate Chip
Paper: Sage Shadow, Chocolate Chip, Sahara Sand, To The Nines Specialty Designer Series Paper
Accessories: Chocolate Chip Grosgrain Ribbon, Large Oval Punch, Modern Label Punch, Dimensionals


Thanks for stopping by!
Karen

Tuesday, September 8, 2009

Long time...no blogger...no stampin'

Hi! Hope you are all doing well! It's been awhile since I stamped, so it was good to back into the swing of things this week. Just took a little break, that's all! So glad you stopped by to visit!

Here is a card that I created for my Day-Time Stampin' Classes and Stamp Club this month. We used the bleaching technique. I poured a little bleach over half of a piece of white felt in a shallow dish. The other half was dry so that we could "stamp off" the bleach a bit before stamping on the Pretty in Pink cardstock. Otherwise you could have had a pool of bleach that probably wouldn't look very pretty!

Supplies:
Stamps: Flower Fancy, Think Happy Thoughts
Ink: Pretty in Pink, Bleach
Paper: Kraft, So Saffron, Very Vanilla, Pretty in Pink
Accessories: 1-3/8" & 1-1/4" Circle Punches, Fillagree Brads, Ivory Taffeta Ribbon, Dimensionals, 1/8" Circle Handheld Punch

Take care and I'll see you soon!

Karen

Tuesday, September 1, 2009

HOLIDAY MINI CATALOG!

Hi! It's September 1st and the new Holiday Mini Catalog has gone LIVE!


Seriously, this is the best mini catalog ever!!! Check it out!

If you like Build-a-Bear, you will definitely want to see the inside!!!

Order on-line 24/7!!

Hopefully, I will be back soon with some great stampin' ideas!!! I'm going to work on it this week!

Take care,
Karen